Nail Clipping
Trimming your dog's nails is not just a part of grooming, but is important for your dog's health as well. It is important to remember that untrimmed nails can cause a variety of problems including broken nails, which are painful and can bleed profusely. In some cases, nails will actually curl and grow back into the dog's feet. A good indication that your dogs' nails are too long is a telltale 'click-click-click' when walking on uncarpeted areas.
How many of us put off trimming our dog's nails until the inevitable veterinary check-up comes around and the veterinarian must do it? If you're like many pet owners, you may be hesitant to trim your dog's nails because you're afraid of cutting the quick of the nail, which may cause pain, or bleeding. Once you learn how to do it, clipping your pet's nails is almost as easy as clipping your own.
When you are trimming your dog's nails, you are only cutting away the excess. Recognizing what is excess and where the nerves and blood vessels begin is what you need to know to make nail trimming a painless process for both you and your dog.


To trim your pet's nails:
Assemble what you will need - trimmers and some styptic powder, Kwik-Stop, or other product to stop bleeding if you nick the quick.
You may want to sit on the floor with your dog, hold your dog in your lap, or have someone hold your dog on a table. Different dogs prefer different methods of being held. So if one isn't working try another. We have found that most dogs prefer to stand on a grooming table with their head in the noose and you lift one leg at time to cut the nails. It seems they feel much more in control and hence, less anxious this way.
Hold your dog’s paw firmly and push on its pads to extend the nail. Locate where the quick ends. With clear or light nails, it is easy to see the pink color where the quick ends.
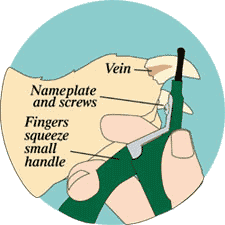
Before you cut the nail look at the diagram above and pay particular attention to which way the nail trimmer is facing. The nail trimmer is a tool and tools work best when they are used correctly. Also make sure that the blade is sharp. They do get dull with use and what ends up happening is that you crush the nail instead of cleaning cutting it. You can get blade replacements at most pet stores! Your dog with thank you.
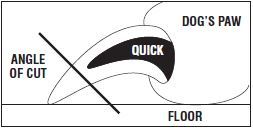
Now, using a nail trimmer for dogs, cut the nail below the quick on a 45-degree angle, with the cutting end of the nail clipper toward the end of the nail. You will be cutting off the finer point. In dogs, especially those with dark nails, make several small nips with the clippers instead of one larger one. Trim very thin slices off the end of the nail until you see a black dot appear towards the center of the nail when you look at it head on. This is the start of the quick that you want to avoid. The good news is that, the more diligent you are about trimming, the more the quick will regress into the nail, allowing you to cut shorter each time. I
n some cases if the nails are brittle, the cut may tend to splinter the nail. In these cases, file the nail in a sweeping motion starting from the back of the nail and following the curve to the tip. Several strokes will remove any burrs and leave the nail smooth.
Don't forget the dewclaws, if your dog has them. On most breeds, if they haven't been removed, dewclaws are 1-4" above the feet on the inner side of the legs. If not trimmed, dewclaws can grow so long they curl up and grow into the soft tissue, like a painful ingrown toenail.
If you accidentally cut the quick, wipe off the blood and apply Kwik-Stop or styptic powder to stop the bleeding. It's not serious and will heal in a very short time.
Some valuable tips:
- Remember, it is better to trim a small amount on a regular basis than to try and remove large portions. Try to trim your dog's nails weekly, even if long walks keep them naturally short. The 'quick,' a blood vessel that runs down the middle of your dog's nail, grows as the nail grows, so if you wait a long time between cuttings, the quick will be closer to the end of the nail. This means more likelihood of bleeding during trimming.
- Trim nails so that when the dog steps down, nails do not touch the floor.
- Invest in a good pair of nail trimmers in an appropriate size for your dog. They can last a lifetime. However the blades do dull quickly and if the blade is not sharp what it does is crush the nail rather than cut it. Change the blade regularly.
Make trimming time fun and not a struggle. Trimming your dog's nails doesn't have to be a chore or unpleasant. If your dog is not used to having his nails trimmed, start slowly and gradually work up to simply holding his toes firmly for 15-30 seconds. Do not let him mouth or bite at you. It can take daily handling for a week or more to get some dogs used to this. When your dog tolerates having his feet held, clip just one nail, and if he is good, praise him and give him a tiny treat. Wait, and then at another time do another nail. Continue until all nails have been trimmed. Slowly you will be able to cut several nails in one sitting, and finally all the nails in one session.
What do the pros do?
We Dremel nails of course! This is the most simple method. It is fast and easy on both the dog and the groomer. Any rotary tool similar to the the Dremel will work.
Why Use a Dremel Rotary Tool to Groom Pet Nails?
Of the reasons why people prefer to groom their pet’s nails with a Dremel rotary tool, the main reason they do is for the pet’s overall comfort. Scissors and guillotine-type clippers apply pressure and pinch the toenail, which can be very uncomfortable to pet toes and feet. Also, clipping toenails increases the likelihood of cutting the internal blood supply to the nail, called the quick. Because grind- ing is more gradual than clipping, it is easier to stop in time before reaching the quick. Should you nick the quick using a rotary tool, the cut is usually smaller, and will heal more quickly than a cut made with a nail clipper.
Before you start
Grooming a pet’s nails for the first time can be a worrisome expe- rience for both the pet and the pet owner. Nail grooming does not have to be a stressful experience. By starting early and consider- ing grooming to be part of your pets training, your pet will become used having their nails groomed.
It is recommended that your pet should feel comfortable with you touching and handling their feet before you expose them to the rotary tool. One way to do this is to take time to manipulate their paws for a few minutes at least once daily. Giving your pet a snack that they enjoy is a good way to associate having their feet touched with a posi- tive food-related experience.
The next step is to get the pet gradually accustomed to the rotary tool itself. Let the pet sniff the tool while it is turned off. Next while keeping the tool in your hand, turn the tool on and let him get used to the sound it makes. Try to get him to sit or lay on his side while the tool is in your hand and running.
Eventually, you need to work up to being able to touch the rotating sanding drum to the pet’s toenails. Do no grinding at this time; sim- ply let the animal become familiar with this new situation. You do not need to touch the tool to the nail for more than a second.
Throughout the entire acclimation process, continue to praise the pet and reward good behavior with his favorite snack. This process may take a couple of days or even weeks. Before long, both you and your pet will be able to relax and even enjoy this grooming time that you share together.
Nail Anatomy
Before trimming pet nails you will need to be able to identify the quick. The diagram shows the basic anatomy of a dog’s toenail. The outer nail is hard, and has no feeling because it has no nerve endings. The core of the nail is the quick. It is made up of tiny blood vessels, nerve endings and is very sensitive. The quick is a vein that “feeds” the toenail. Should you cut the quick while trim- ming a nail, the nail will start to bleed.
Light colored nails are often transparent enough to allow you to see the quick’s pink core. Dark colored nails may not allow you to see where the quick is. Sometimes, dog’s have both light and dark colored nails that allow you to estimate the length of the quick. The diagram also shows the ideal angle in which to trim a pet’s nails. The proper angle may vary according to the pet owner’s wishes or the pet’s unique anatomy.
The Nail Grooming Process
It is important to let the speed of the rotary tool do the work. You should never apply pressure to the toenail with the spinning sanding drum. Allow the speed of the sanding drum to remove the nail material without adding pressure. Pressure causes the nail to get too hot causing discomfort for your pet.
The rotary tool’s spinning sanding drum should not be kept against the nail longer than three seconds at a time. It is recommended that you alternate between all the nails on two paws at a time. This rotation method allows the nails to cool before they are ground a second time.
Support the toe and nail in one hand while using the rotary tool in the other hand. This lessens the vibration of the grinding proce- dure and is more comfortable for your pet. Pushing gently on the bottom of the paw’s pad extends the nail slightly for easier groom- ing.
Pet Safety
Secure the pet. Some pets may become nervous in the presence of the tool. The operator needs both hands to groom the nail. It may be helpful to have another person assist in restraining the pet.
Keep pet hair away from spinning parts. Hair can entangle in the tool, causing injury to your pet.
Safety Tips
- Should hair be accidentally caught in the rotary tool, immediately turn off the tool and untangle the hair from the tool.
- For pets with particularly long hair, use an old sock to cover the toe, foot and leg of the pet and isolate the nail. Push the nail out through a small opening at the tip of the sock to groom the nail.
- Keep styptic powder on hand in case of bleeding. Styptic powder is available at most pet supply stores. Follow the directions on the packaging for proper use instructions.

